SP_ED_G_PIC

ED_G_PIC()

  Short:
  ------
  ED_G_PIC() Returns appropriate picture for getting a field

  Returns:
  --------
  <cPicture> picture clause

  Syntax:
  -------
  ED_G_PIC(cFieldName)

  Description:
  ------------
  Returns a picture clause appropriate for editing
  field where <cFieldName> is the name of the field. Applicable to
  Character and numeric fields

  Examples:
  ---------
   @10,10 GET AMOUNT PICT ED_G_PIC("AMOUNT")
   * would return a picture of "9999.99" depending
   * on length and decimals

  Source:
  -------
  S_EDPICT.PRG


What is Preprocessor ?

What is Preprocessor and How it Works ?

Preprocessor  Primer ( .pdf )

Preprocessor Primer

What is Preprocessor and How it Works ?

Preprocessor Primer ( .pdf )

PICTURE function / template

What is PICTURE function – template ?

@…SAY comand display data at a specified screen or printer row and column with syntax :

@ <nRow>, <nCol> SAY <exp> [PICTURE <cSayPicture>] [COLOR <cColorString>]

@…SAY command output can be formatted using the PICTURE clause with a <cSayPicture>. This performs the same action as the TRANSFORM() function. A <cSayPicture> may consist of a function and/or a template. A PICTURE function imposes a rule on the entire @…SAY output. A PICTURE template defines the length of the @…SAY output and the formatting rule for each position within the output.

Function string:

A PICTURE function string specifies formatting rules which apply to the SAY’s entire display value, rather than to particular character positions within it.

The function string consists of the @ character, followed by one or more additional characters, each of which has a particular meaning (see table below).

The function string must not contain spaces.

A function string may be specified alone or with a template string. If both are present, the function string must precede the template string, and the two must be separated by a single space.

SAY and TRANSFORM() PICTURE Format Functions
---------------------------------------------------------------------
Function Action
---------------------------------------------------------------------
B Displays numbers left-justified
C Displays CR after positive numbers
D Displays dates in SET DATE format
E Displays dates and numbers in British format
R Nontemplate characters are inserted
X Displays DB after negative numbers
Z Displays zeros as blanks
( Encloses negative numbers in parentheses
! Converts alphabetic characters to uppercase
---------------------------------------------------------------------

 Template string:

A PICTURE template string specifies formatting rules on a character-by-character basis. The template string consists of a series of characters, some of which have special meanings (see table below). Each position in the template string corresponds to a position in the displayed SAY value. Characters in the template string that do not have assigned meanings are copied verbatim into the displayed SAY value. If you use the @R picture function, characters without special PICTURE template string meaning are inserted between characters of the display value; otherwise, they overwrite the corresponding characters of the display value. You may specify a template string alone or with a function string. If both are present, the function string must precede the template string, and the two must be separated by a single space.

SAY and TRANSFORM() Template Symbols
---------------------------------------------------------------------
Template Action
---------------------------------------------------------------------
A,N,X,9,# Displays digits for any data type
L Displays logicals as "T" or "F"
Y Displays logicals as "Y" or "N"
! Converts alphabetic characters to uppercase
$ Displays a dollar sign in place of a leading space in a number
* Displays an asterisk in place of a leading space in a number
. Specifies a decimal point position
, Specifies a comma position
---------------------------------------------------------------------

Examples :

This example uses an @…SAY with a PICTURE clause to display formatted output:

nNetIncome = 7125.50
nNetLoss = -125.50
cPhone = "2134567890"
cName = "Kate Mystic"
@ 1, 1 SAY nNetIncome PICTURE "@E 9,999.99" // Result: 7.125,50
@ 2, 1 SAY nNetLoss PICTURE "@)" // Result: (125.50)
@ 3, 1 SAY cPhone PICTURE "@R (999)999-9999" // Result: (213)456-7890
@ 4, 1 SAY cName PICTURE "@!" // Result: KATE MYSTIC

This example is a small label printing program that uses SET DEVICE to direct output to the printer and SETPRC() to suppress automatic EJECTs:

USE Salesman INDEX Salesman NEW
SET DEVICE TO PRINTER
DO WHILE !EOF() // Print all records
   @ 2, 5 SAY RTRIM(FirstName) + ", " + LastName
   @ 3, 5 SAY Street
   @ 4, 5 SAY RTRIM(City) + ", " + State + " " + PostalCode
   @ 6, 0 SAY SPACE(1) // Move to label bottom
   SETPRC(0, 0) // Suppress page eject
   SKIP // Next record
ENDDO
SET DEVICE TO SCREEN
CLOSE Salesman

User Interface Terms

Background Color :

The color that appears behind displayed text of another color (the foreground color).

See Also: Foreground Color

Column :

A numeric value that represents a position on the display screen or on the printed page.

Console Input/Output :

A style of operation of the keyboard and display that emulates a simple typewriter-like interface. Console input echoes each key typed and provides processing for the backspace and return keys. Console output wraps to the next line when the output reaches the right edge of the visible display, and scrolls the display when the output reaches the bottom of the visible display.

See Also: Full-screen Input/Output

Cursor :

An onscreen indicator used to show the current keyboard input focus and is displayed as a block or underline character. The cursor moves in response to characters or control keys typed by the user.

Enhanced Color :

The color used to display GETs or PROMPTs (if INTENSITY is ON).

See Also: Standard Color

Foreground Color :

The color of text appearing on the screen, usually on a different colored background.

See Also: Background Color

Full-screen Input/Output :

A style of operation of the keyboard and display used for complex data entry and display tasks. Full-screen input and output are generally performed using the @..SAY, @..GET and READ commands. Full-screen output is distinguished from console-style output by the fact that control characters (e.g., backspace, carriage return) are not processed, and wrapping and scrolling do not occur at the boundaries of the visible display area.

See Also: Console Input/Output

Highlight :

Indicates input focus for menus, browsers, or GETs. With menus and browsers, the currently selected item or cell has input focus and is displayed in the current enhanced color or inverse video. With GETs, the current GET is highlighted in the current enhanced color or inverse video while the other GETs are displayed in the current standard color if an unselected color setting is active.

See Also: Cell, Enhanced Color, Input Focus, Standard Color

Input Focus :

The GET, browse cell, or menu item where user interaction can take place is said to have input focus. The item with input focus usually is displayed in enhanced color or inverse video.

Insert Mode :

A data entry mode entered when the user presses the insert key. When this mode is active, characters are inserted at the cursor position. Text to the right of the cursor is shifted right.

See Also: Overstrike Mode

Keyboard Buffer :

An area of memory dedicated to storing input from the keyboard while a program is unable to process the input. When the program is able to accept the input, the keyboard buffer is emptied.

Menu :

An onscreen list of choices from which the user selects. Menus range from simple to elaborate forms. Two examples are menus that pull down from the top of the screen (an elaborate type requiring more programming), or a simple list of numbered items from which the user selects by entering the appropriate number.

Overstrike Mode :

A data entry mode entered when the user presses the insert key. When this mode is active, characters are entered at the cursor position and text to the right of the cursor remains stationary.

Picture :

A string that defines the format for data entry or display in a GET, SAY, or the return value of TRANSFORM(). Picture strings are comprised of functions which affect the formatting as a whole and a series of template characters that affect formatting on a character by character basis.

See Also: Template

Prompt :

A series of characters displayed on the screen indicating that input from the keyboard is expected.

Relative Addressing :

To refer to a memory address, array element, screen location, or printer location with respect to another value, rather than referring to a specific address or element.

Row :

A numeric expression that evaluates to an integer identifying a screen or printer row position.

See Also: Column, Field, Record

Scoreboard :

An area of the display on line 0 beginning at column 60 that displays status information during certain data entry operations.

Scrolling :

The action that takes place when the user attempts to move the cursor or highlight beyond the window boundary to access information not currently displayed.

See Also: Window

Standard Color :

The color pair definition that is used by all output options (such as SAY and ?), with the exception of GETs and PROMPTs, that use the enhanced color pair.

See Also : Enhanced Color

Template :

A mask that specifies the format in which data should be displayed. For example, you might want to store phone numbers as “9999999999” to save space, but use a template to display the number to the user as “(999) 999-9999.”

Typeahead Buffer :

See : Keyboard Buffer

Unselected Color :

The color pair definition used to display all but the current GET or the GET that has input focus. If this color setting is specified, the current GET is displayed using the current enhanced color.

See Also: Enhanced Color

User Function :

A user-defined function called by ACHOICE(), DBEDIT(), or MEMOEDIT() to handle key exceptions. A user function is supplied to one of these functions by passing a parameter consisting of a string containing the function’s name.

User Interface :

The way a program interacts with its user (i.e., menu operation and selection, data input methods, etc.)

Wait State :

A wait state is any mode that extracts keys from the keyboard except for INKEY(). These modes include ACHOICE(), DBEDIT(), MEMOEDIT(), ACCEPT, INPUT, READ and WAIT.

Window :

A rectangular screen region used for display. A window may be the same size or smaller than the physical screen. Attempting to display information that extends beyond the specified boundaries of the window clips the output at the window edge.

Word Wrapping :

The process of continuing the current text on the next line of a display when a boundary is reached and breaking the text on a word boundary.

ToolBar Control

HMG Tutor 18

More Organization (TOOLBAR Control)

Toolbars are used to group command buttons in a bar located (usually) at window top (under main menu bar).

#include "hmg.ch"
Function Main
DEFINE WINDOW Win_1 ;
   AT 0,0 ;
   WIDTH 640 HEIGHT 480 ;
   TITLE 'Tutor 18: ToolBar Test' ;
   MAIN ;
   FONT 'Arial' SIZE 10
   DEFINE MAIN MENU
      POPUP '&File'
         ITEM '&Disable ToolBar Button' ACTION ;
               Win_1. ToolBar_1.Button_1.Enabled := .F.
         ITEM '&Enable ToolBar Button' ACTION ;
               Win_1. ToolBar_1.Button_1.Enabled := .T.
         ITEM '&Exit' ACTION Win_1.Release
      END POPUP
   END MENU
   DEFINE TOOLBAR ToolBar_1 BUTTONSIZE 80,80 FLAT BORDER
      BUTTON Button_1 ;
         CAPTION '&Button &1' ;
         PICTURE 'button1.bmp' ;
         ACTION MsgInfo('Click! 1')
      BUTTON Button_2 ;
         CAPTION '&Button 2' ;
         PICTURE 'button2.bmp' ;
         ACTION MsgInfo('Click! 2') ;
         SEPARATOR
      BUTTON Button_3 ;
         CAPTION 'Button &3' ;
         PICTURE 'button3.bmp' ;
         ACTION MsgInfo('Click! 3')
    END TOOLBAR
END WINDOW
CENTER WINDOW Win_1
ACTIVATE WINDOW Win_1
Return Nil

IMAGE Control

HMG Tutor 14

Displaying Images (The IMAGE Control)

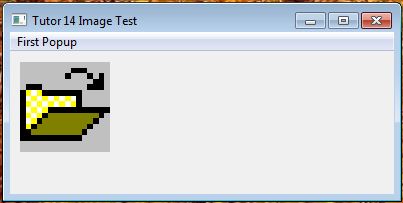
The IMAGE control allows to show image files in your program.

@ 10,10 IMAGE Image_1 ;
        PICTURE 'Demo.Bmp' ;
        WIDTH 90 ;
        HEIGHT 90

#include "hmg.ch"
Function Main
DEFINE WINDOW Win_1 ;
   AT 0,0 ;
   WIDTH 400 ;
   HEIGHT 200 ;
   TITLE 'Tutor 14 Image Test' ;
   MAIN
   DEFINE MAIN MENU
      POPUP "First Popup"
         ITEM 'Change Image Content' ACTION ;
               Win_1.Image_1.Picture := 'Open.Bmp'
         ITEM 'Retrieve Image Content' ACTION ;
               MsgInfo ( Win_1.Image_1.Picture)
      END POPUP
  END MENU
  @ 10,10 IMAGE Image_1 ;
          PICTURE 'Demo.Bmp' ;
          WIDTH 90 ;
          HEIGHT 90
END WINDOW
ACTIVATE WINDOW Win_1
Return

CheckButton

HMG Tutor 11

Button + CheckBox = CheckButton

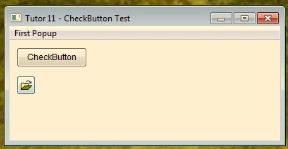
The CheckButton control, acts like a checkbox, but looks like a button. Like buttons, It comes in two flavors: Text and Graphical.

@ 10,10 CHECKBUTTON CheckButton_1 ;
        CAPTION 'CheckButton' ;
        VALUE .F.

@ 50,10 CHECKBUTTON CheckButton_2 ;
        PICTURE 'Open.Bmp' ;
        WIDTH 27 ;
        HEIGHT 27 ;
        VALUE .F. ;
        TOOLTIP 'Graphical CheckButton'

#include "hmg.ch"
Function Main
DEFINE WINDOW Win_1 ;
   AT 0,0 ;
   WIDTH 400 ;
   HEIGHT 200 ;
   TITLE 'Tutor 11 - CheckButton Test' ;
   MAIN
   DEFINE MAIN MENU
      POPUP "First Popup"
         ITEM 'Change Text CheckButton Value' ACTION ;
               Win_1.CheckButton_1.Value := .T.
         ITEM 'Retrieve Text CheckButton Value' ACTION ;
               MsgInfo ( if(Win_1.CheckButton_1.Value,'.T.','.F.'))
         SEPARATOR
         ITEM 'Change Picture CheckButton Value' ACTION ;
               Win_1.CheckButton_2.Value := .T.
         ITEM 'Retrieve Picture CheckButton Value' ACTION ;
               MsgInfo ( if(Win_1.CheckButton_2.Value,'.T.','.F.'))
      END POPUP
   END MENU
   @ 10,10 CHECKBUTTON CheckButton_1 ;
           CAPTION 'CheckButton' ;
           VALUE .F.
   @ 50,10 CHECKBUTTON CheckButton_2 ;
           PICTURE 'Open.Bmp' ;
           WIDTH 27 ;
           HEIGHT 27 ;
           VALUE .F. ;
           TOOLTIP 'Graphical CheckButton'
END WINDOW
ACTIVATE WINDOW Win_1
Return